Unit-3 (setting up Redux Toolkit)
Accessing the Unit-3 tutorial
Clone the unit-3, branch to start this tutorial.
In this unit we will be covering global state management using Redux, specifically Redux Toolkit. However, before we start we need to understand what global state management is in React.
The problem
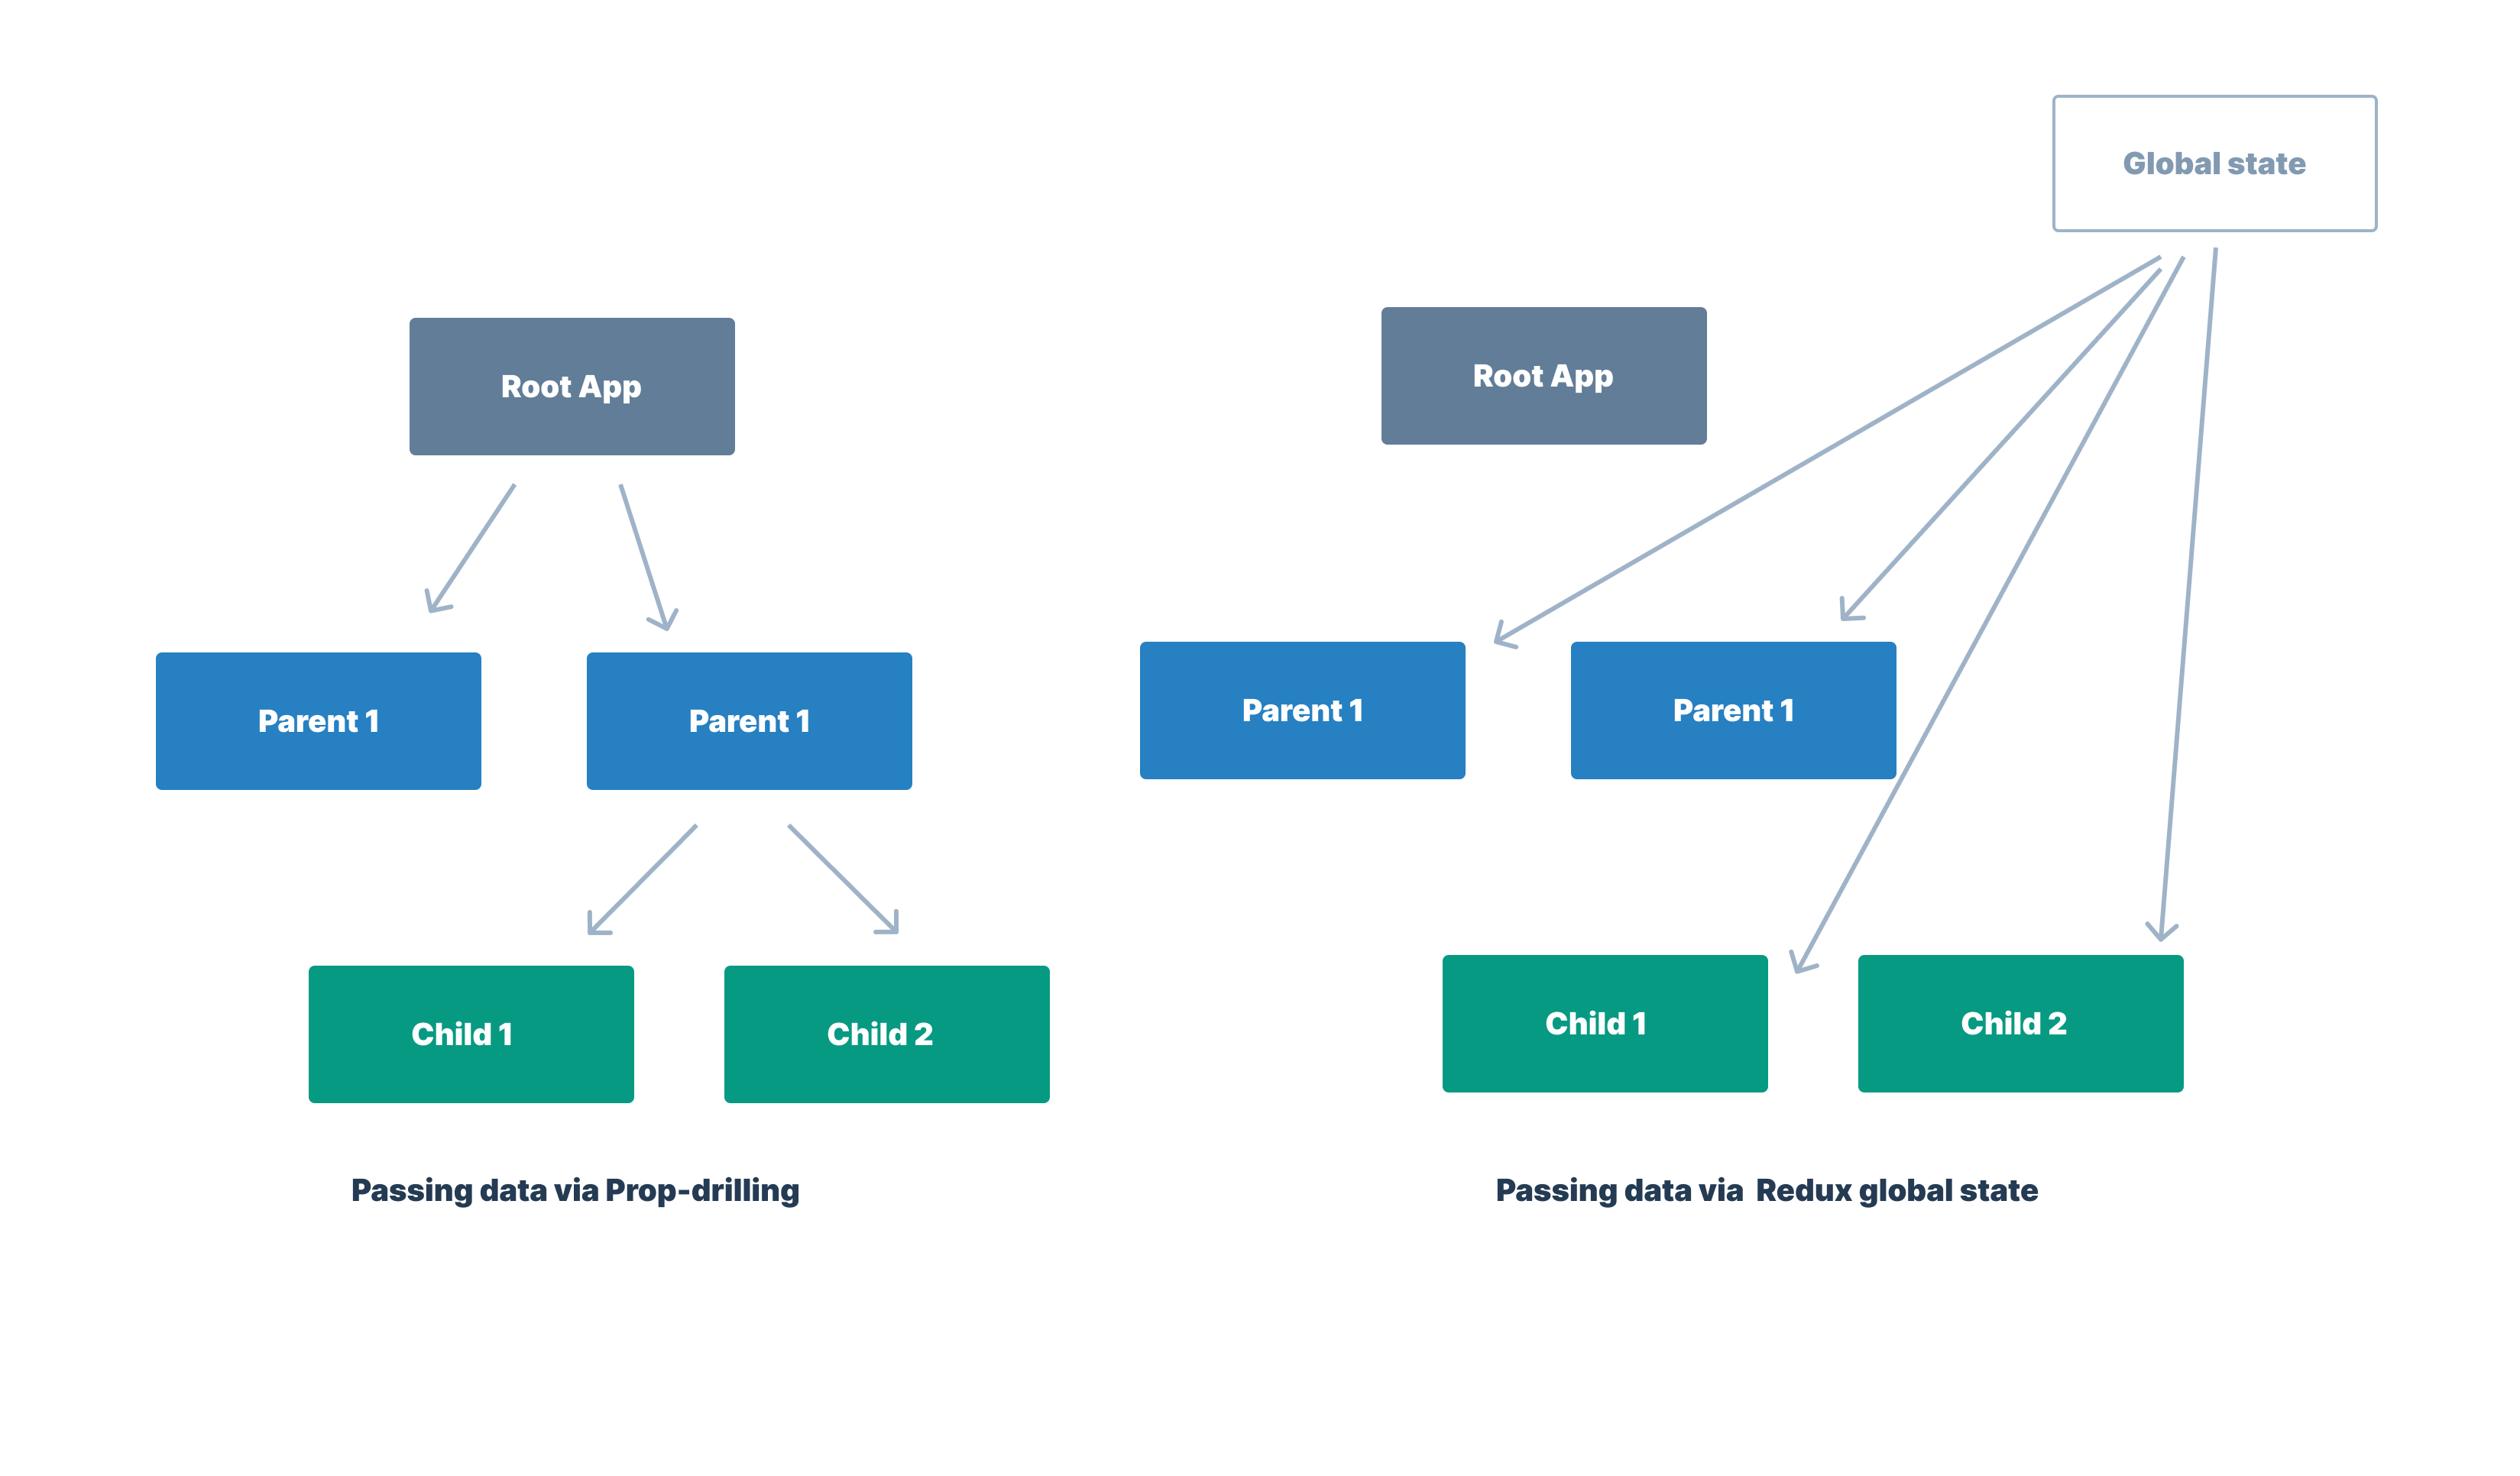
As of now we have been using prop-drilling to pass data between components.
Prop drilling refers to the passing of the data from the parent to all the nested children in the React Tree.
For example in the Unit-1 answers we pasted down the
showMobileNav state from the <Layout /> component to the <Header /> and <Nav /> child components to show and hide the navbar on mobile screens.
This worked as the showMobileNav state was only being passed down to two components however, this wouldn't be scalable if needed to share data between a lot of components for the following reasons:
- If we pass data via props from one child to another, then to another and so on... it makes it very hard for use to keep track of where this data is coming from.
- If we update the data in one component it will re-render all of our components, if we had a lot of components this could cause some performance issues.
The solution
Wouldn't it be a good idea is we had some sort of global state that acted like a mini database, where we can access all of a data from one place anywhere in our application. Well luckily there is and we can do this using one of the following:
The context API
The React Context API is a way for a React app to effectively produce global variables that can be passed around. This is the alternative to "prop drilling" or moving props from grandparent to child to parent, and so on. Context is also touted as an easier, lighter approach to state management using Redux.
Redux
Redux is a predictable state container designed to help you write JavaScript apps that behave consistently across client, server, and native environments and are easy to test.
note
Why not use the context API over Redux?
To cut a long story sort context API is a lot easier to set up and has a lot less boilerplate code however,
Redux has:
- Consistent architectural patterns
- Debugging capabilities
- Middleware
- Addons and extensibility
- Cross-platform and cross-framework usage
- Depending on the app setup, it much better performance than working with just Context
Redux Tookit
Recently Redux Team launched Redux Toolkit, an officially recommended and a SOPE library that stands for Simple, Opinionated, Powerful, and Effective state management library. It allows us to write more efficient code, speed up the development process, and automatically apply the best-recommended practices.
It was mainly created to solve the THREE MAJOR ISSUES with Redux:
- Configuring a Redux store is too complicated
- Have to add a lot of packages to build a large scale application
- Redux requires too much boilerplate code which makes it cumbersome to write efficient and clean code.
What we are going to implement
For this project we are going to use Redux Toolkit because we want to make use of all the advantages Redux has over the Context api but not have deal with the unnecessary boilerplate code that comes with Redux. Before we do that, have a look at the diagram bellow showing the difference between prop-drilling and Redux Tool kit, just to 100% make sure you understand the difference.
Concepts and Data Flow
note
This section (Concepts and Data Flow) has been copied directly from the Redux documentation. As this explain want we aim to achieve in a concise way.
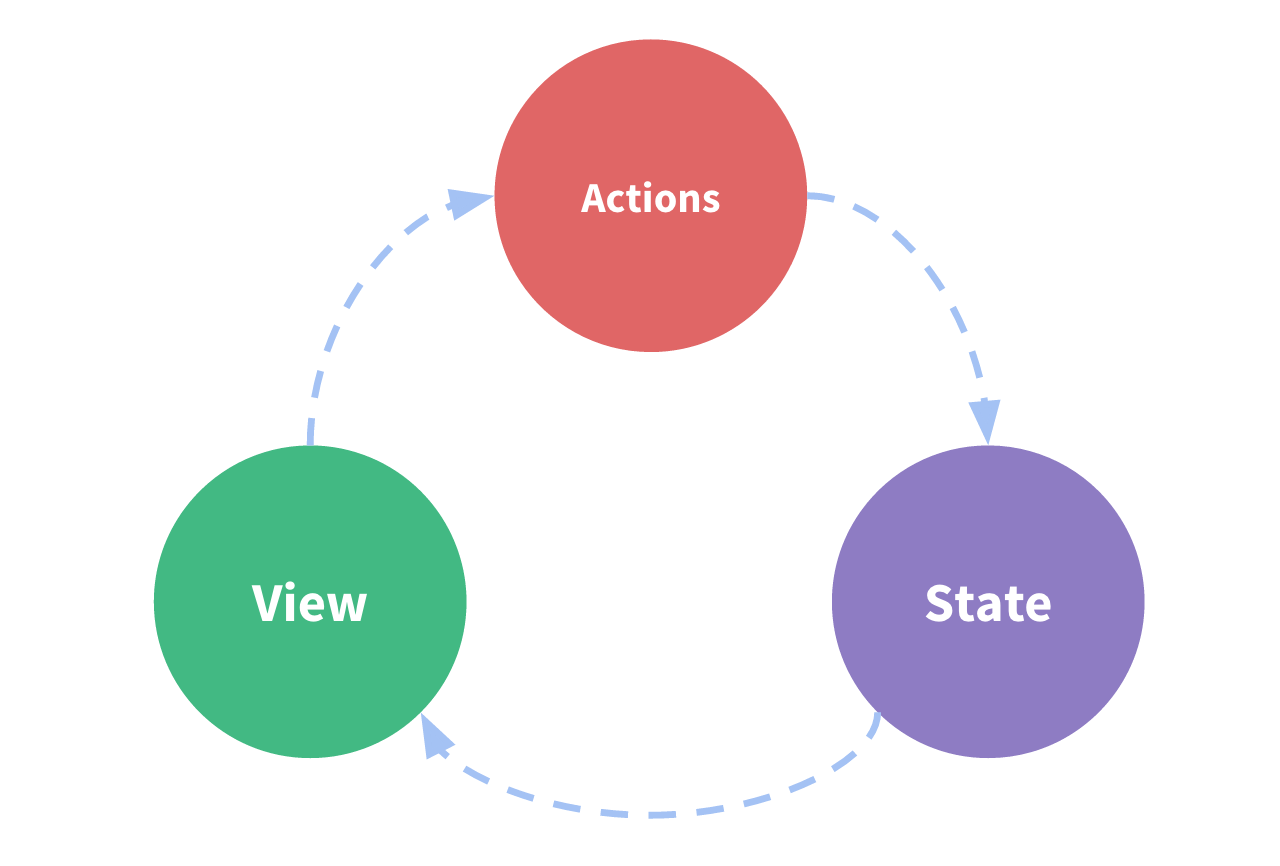
In the following sections we are going to set up:
- The state, the source of truth that drives our app;
- The view, a declarative description of the UI based on the current state
- The actions, the events that occur in the app based on user input, and trigger updates in the state
This is a small example of "one-way data flow":
- State describes the condition of the app at a specific point in time
- The UI is rendered based on that state
- When something happens (such as a user clicking a button), the state is updated based on what occurred
- The UI re-renders based on the new state
Setting up our global state
In this unit (unit-3) we have everything we need already set up, however lets walk though the code to see whats going on.
info
Redux DevTools extension
Redux Toolkit should automatically configure the Redux DevTools extension, however if you haven't already got it installed you will need to do so using the following link Redux DevTools extension. We will be using this extension later on in this unit.
The following files have been added.
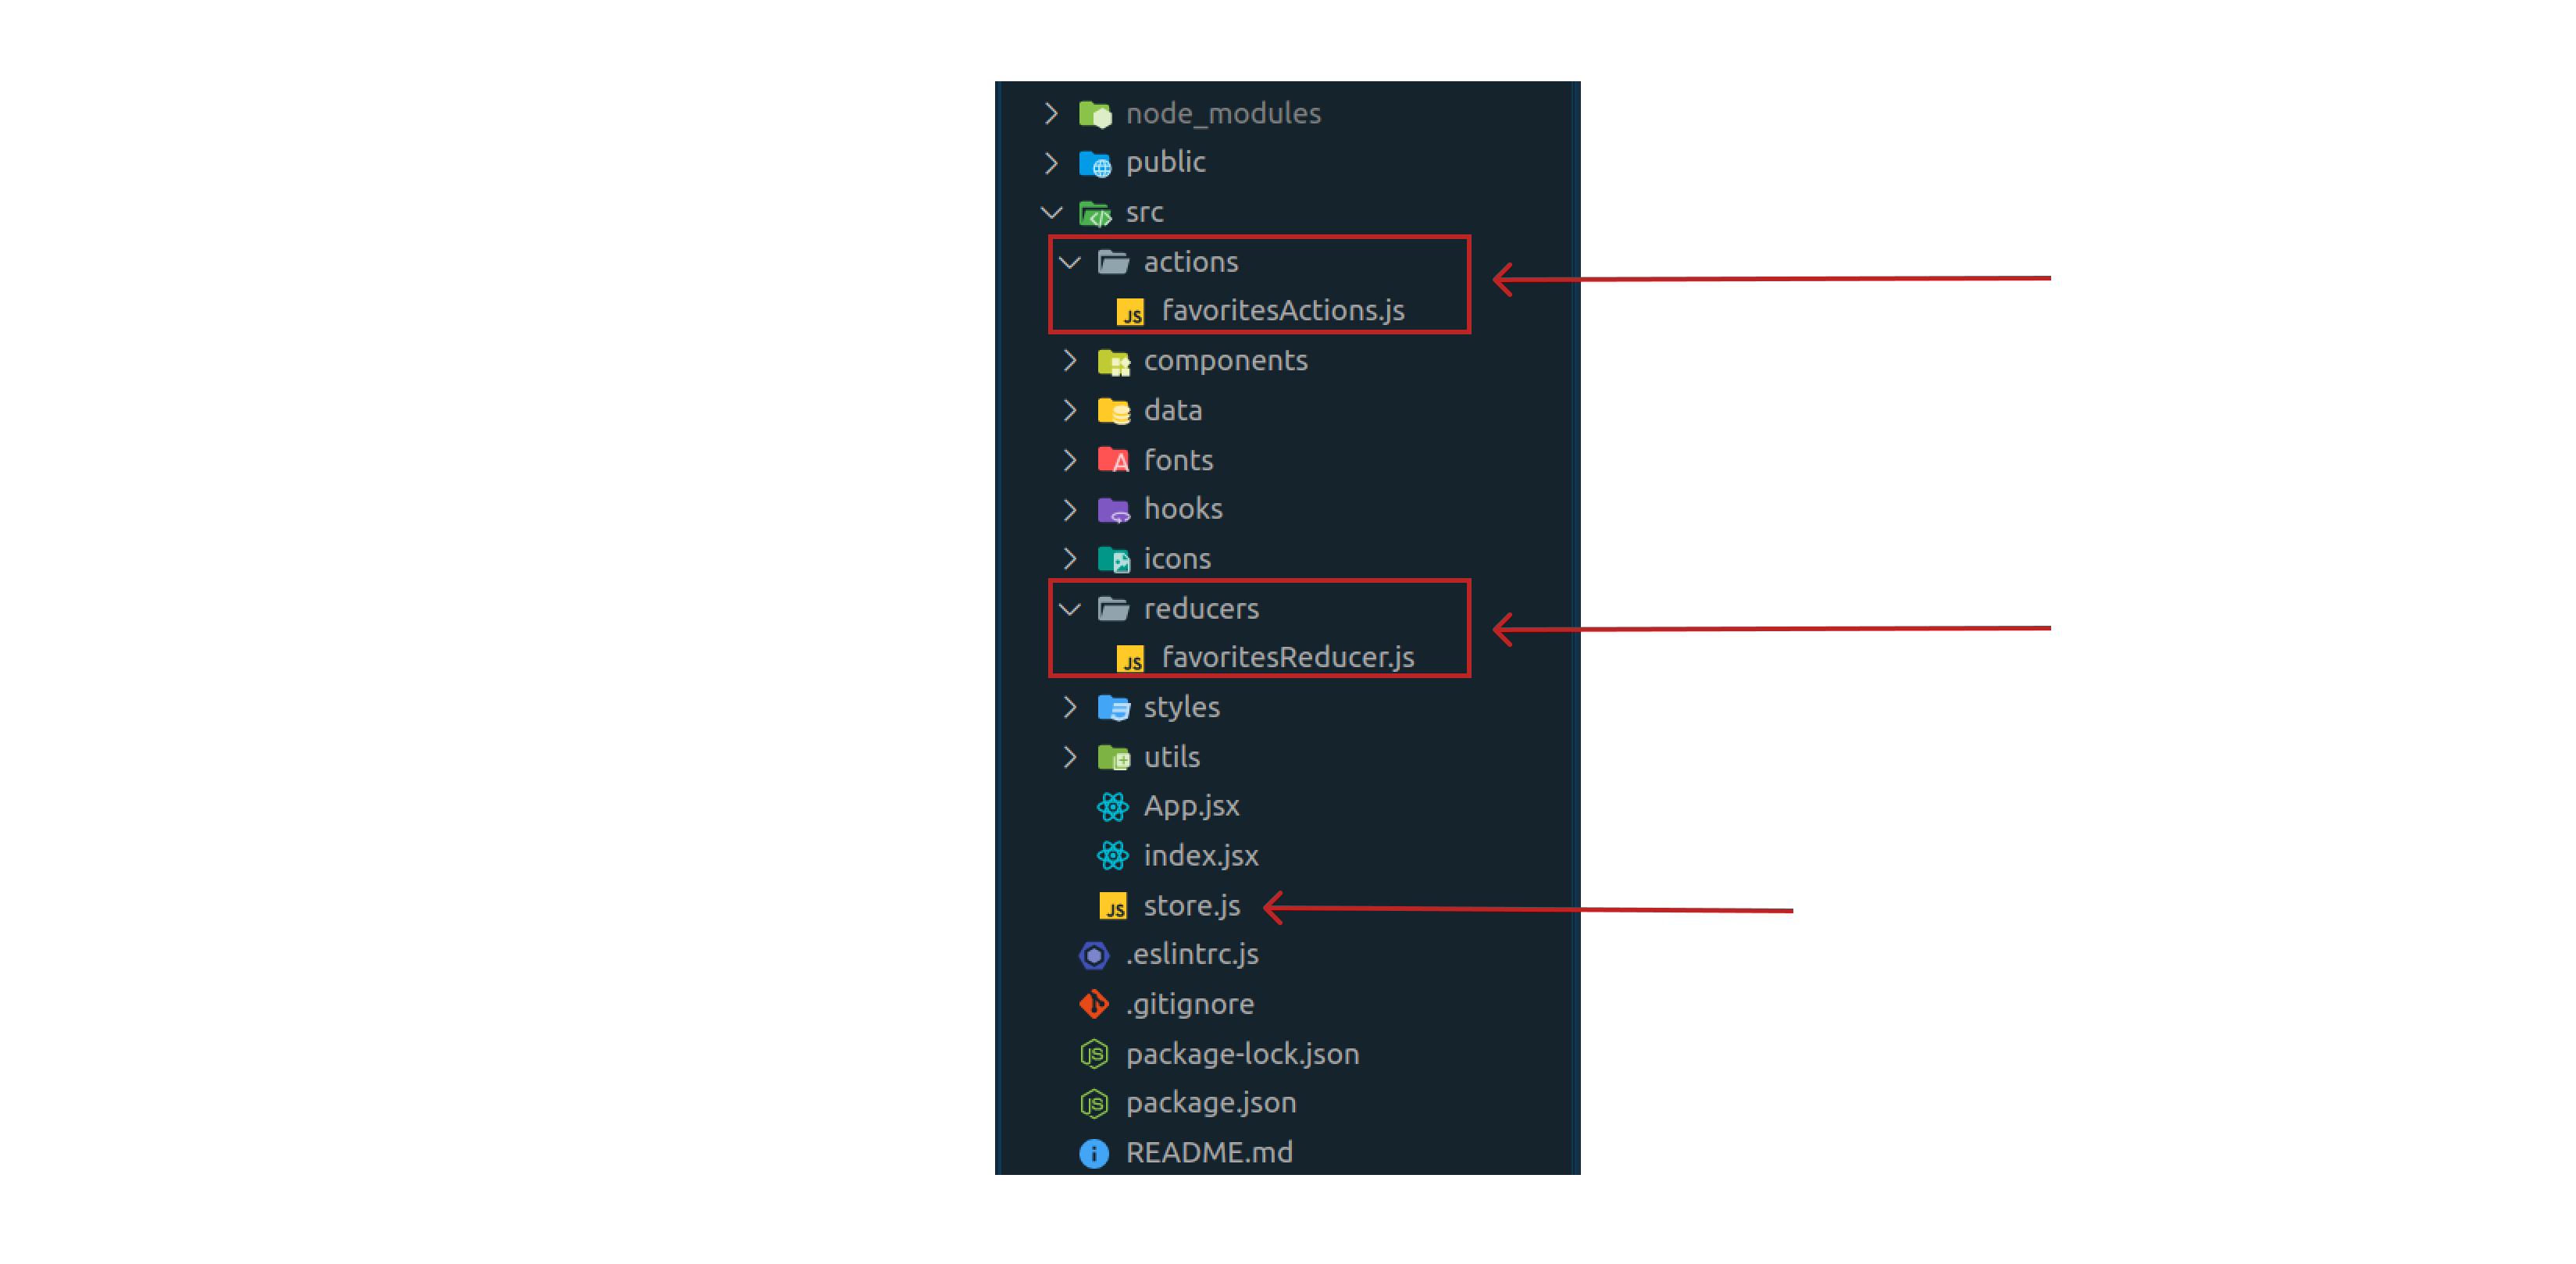
Creating the Redux store
First lets start with store.js, the following code has been added, This creates a Redux store, and also automatically configure the Redux DevTools extension so that we can inspect the store while developing. Lets pass an empty reducer object into our store, we will update this shortly but for now lets move onto the next step.
/* eslint-disable import/prefer-default-export */
import { configureStore } from '@reduxjs/toolkit';

export const store = configureStore({
  reducer: {},
});
Providing the Redux Store to React
Now our store has been created, we can make it available to our React components by putting a React-Redux <Provider> around our application (in our index.js file). The Redux store that was created is then passed into the <Provider>. Then <App> is passed into the <Provider> as a child, this means that the App now has access to the store. So, every child component in our app can now have access to our sore.
import React from 'react';
import ReactDOM from 'react-dom';
import { Provider } from 'react-redux';
import { store } from './store';
import App from './App';

ReactDOM.render(
  <React.StrictMode>
    <Provider store={store}>
      <App />
    </Provider>
  </React.StrictMode>,
  document.getElementById('root'),
);
Creating our actions
Next we need to create the addToFavorites action using the createAction function in actions/favoritesActions.js file. We don't necessary need to have our actions in a separate file as we could have them in the same file as favoritesReducer.js (favoritesReducer.js is covered in the next section) however, if we had a lot of actions it may be tidier to have them in their own file.
import { createAction } from '@reduxjs/toolkit';

export const addToFavorites = createAction('ADD_TO_FAVORITES');
Creating our reducer
In our reducers/favorites/favoritesReducer.js file lets set up our favoritesReducer. First lets add our initialState which is an object with the key value that is an empty array.
The createReducer function:
Supports two different forms of defining case reducers to handle actions: a "builder callback" notation and a "map object" notation. Both are equivalent, but the "builder callback" notation is preferred.
To put it simply, the "builder callback" will allow us to to make changes to our store. For example, in the code the following addCase will push our action.payload to our store.
import { createReducer } from '@reduxjs/toolkit';
import { addToFavorites } from '../actions/favoritesActions';

const initialState = {
  value: [],
};

const favoritesReducer = createReducer(initialState, (builder) => {
  builder
    .addCase(addToFavorites, (state, action) => {
      state.value.push(action.payload);
    });
});

export default favoritesReducer;
info
Important
In our code example above we are mutating our state state.value.push(action.payload);
In Redux
Redux requires reducer functions to be pure and treat state values as immutable. While this is essential for making state updates predictable and observable, it can sometimes make the implementation of such updates awkward.
In Redux Toolkit
To make things easier,
createReduceruses immer to let you write reducers as if they were mutating the state directly. In reality, the reducer receives a proxy state that translates all mutations into equivalent copy operations.
To find our more check the Redux Toolkit docs.
Don't get it?
Don't worry we will shortly be using React redux devtools to understand whats going on when we use our addToFavorites reducer.
Adding our Reducer to the Store
Now we need to import the reducer function from the favorites and add it to our store. By defining a field inside the reducer parameter, we tell the store to use this slice reducer function to handle all updates to that state.
import { configureStore } from '@reduxjs/toolkit';
import favoritesReducer from './reducers/favoritesReducer';

export const store = configureStore({
  reducer: {
    favorites: favoritesReducer,
  },
});
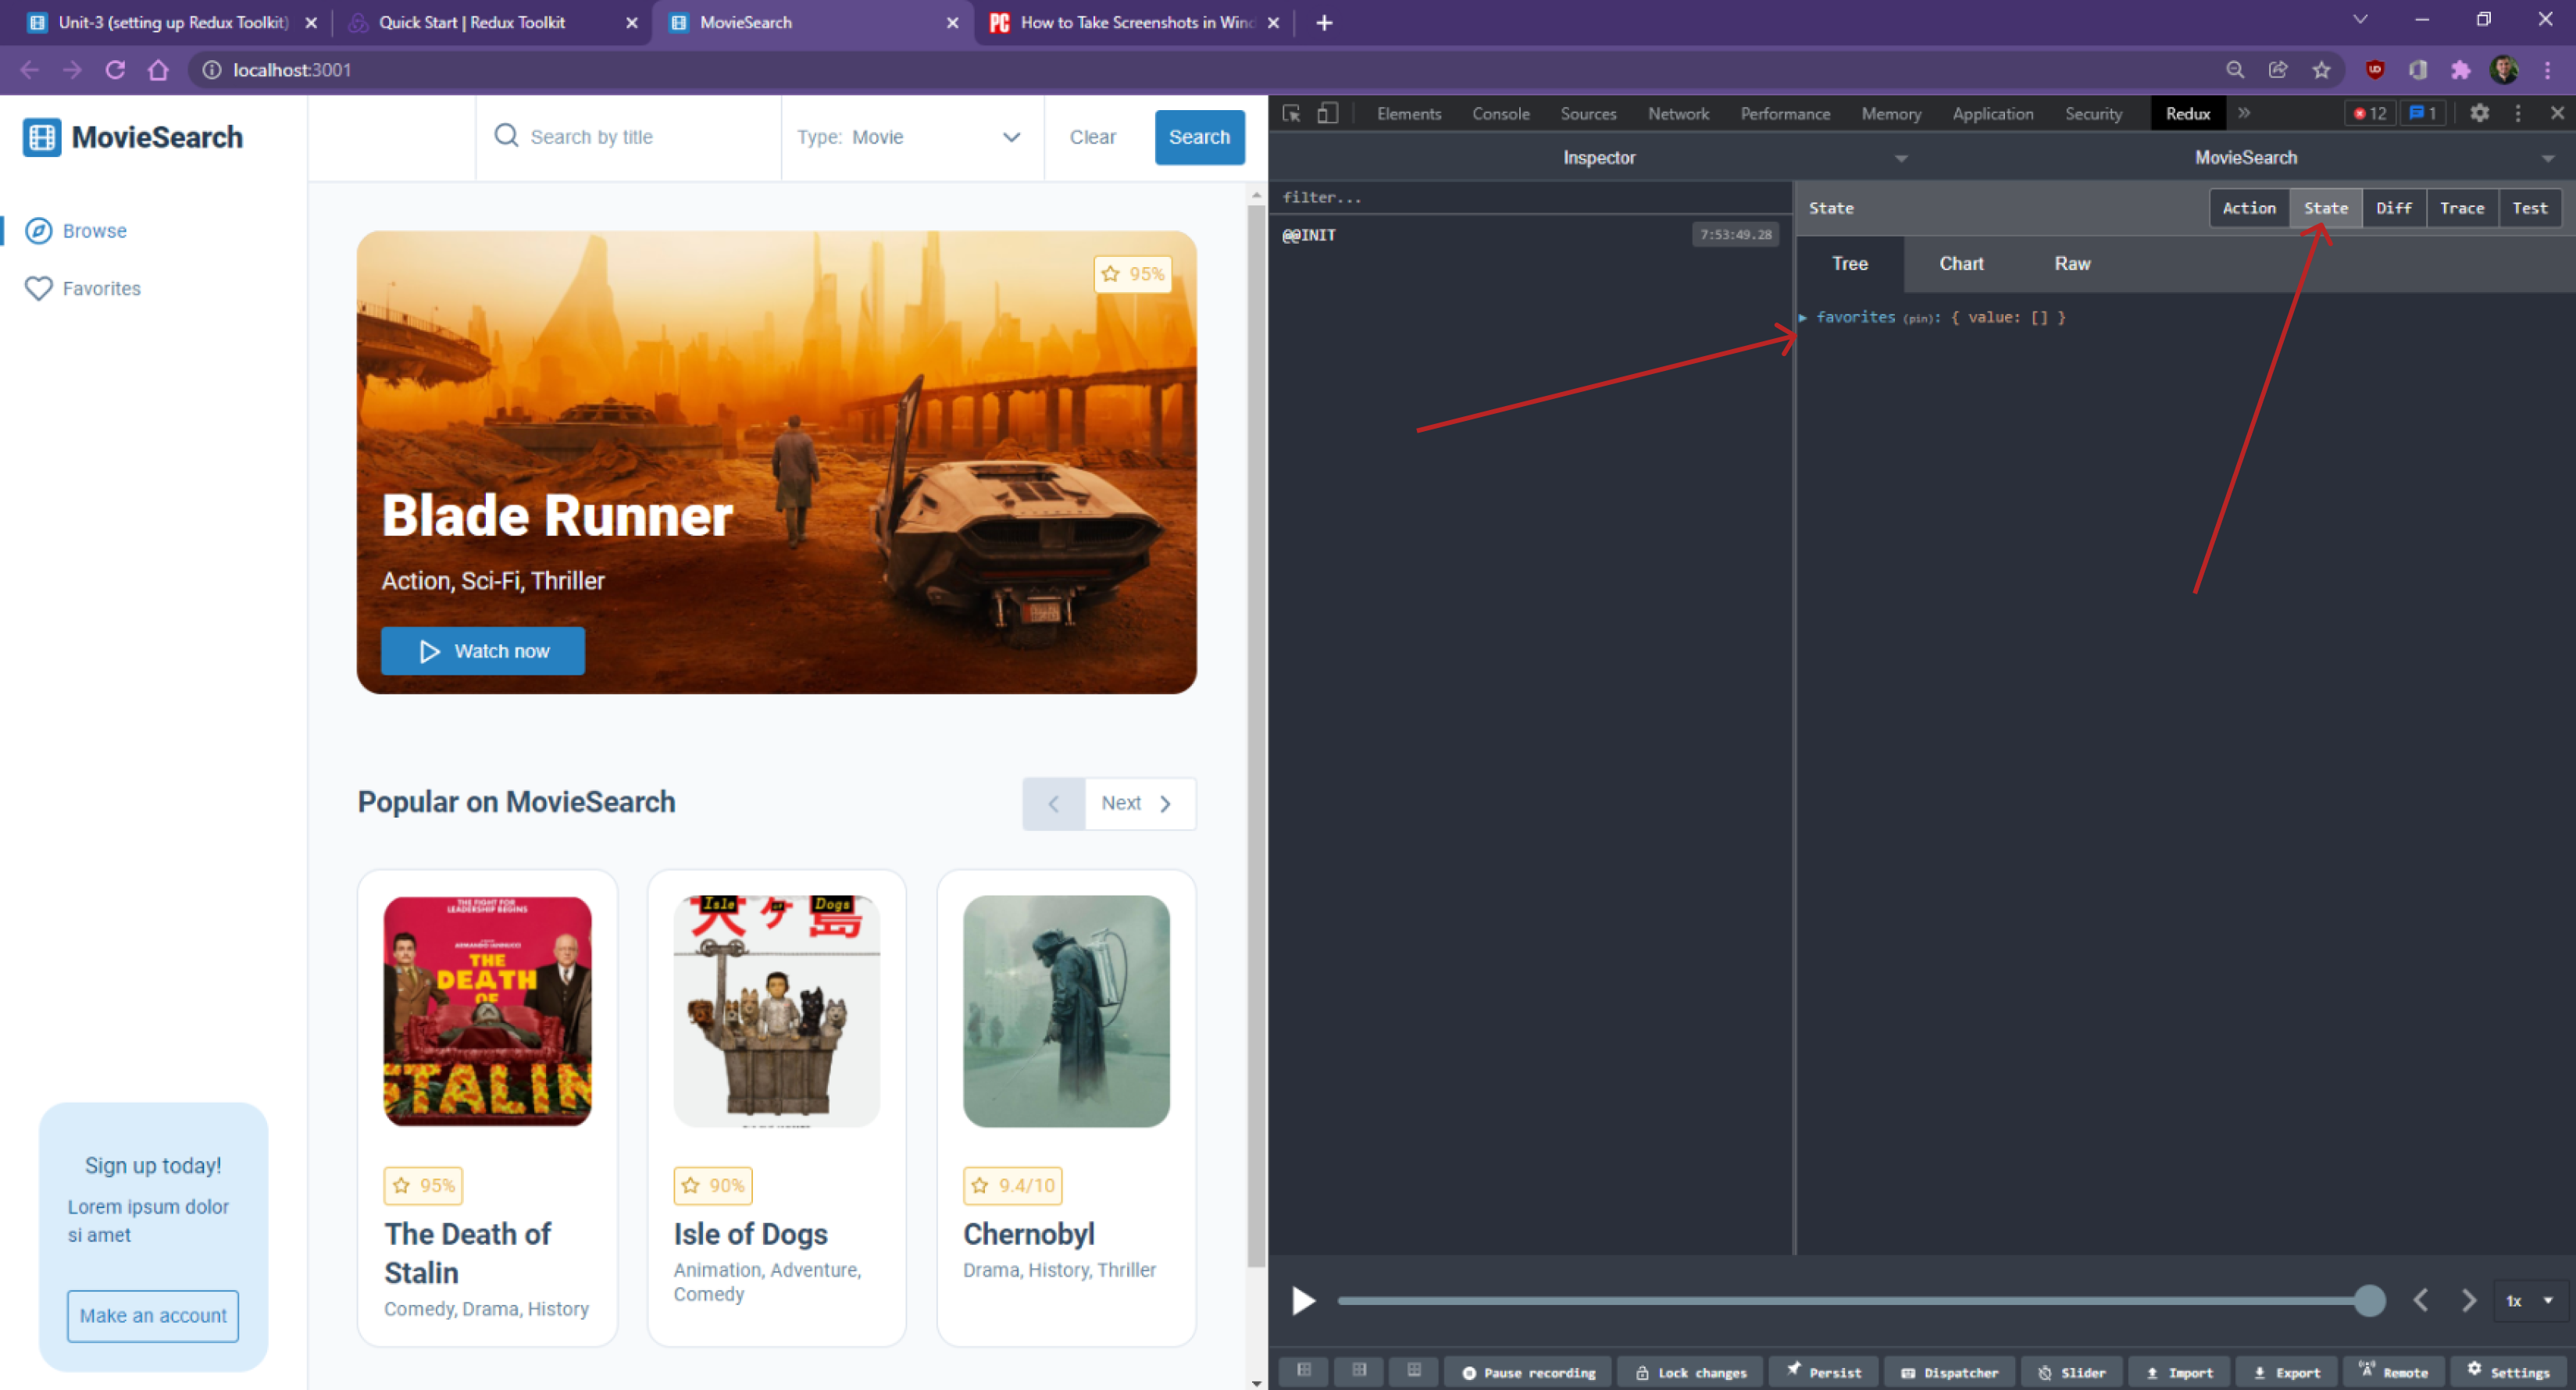
Lets check everything is working correctly by inspecting our Redux state in the application. We can do this buy right clicking then selecting the "inspect" option. Assuming we have the Redux DevTools extension extension installed, all we need to do is click on two arrows in our devtools the click on Redux.
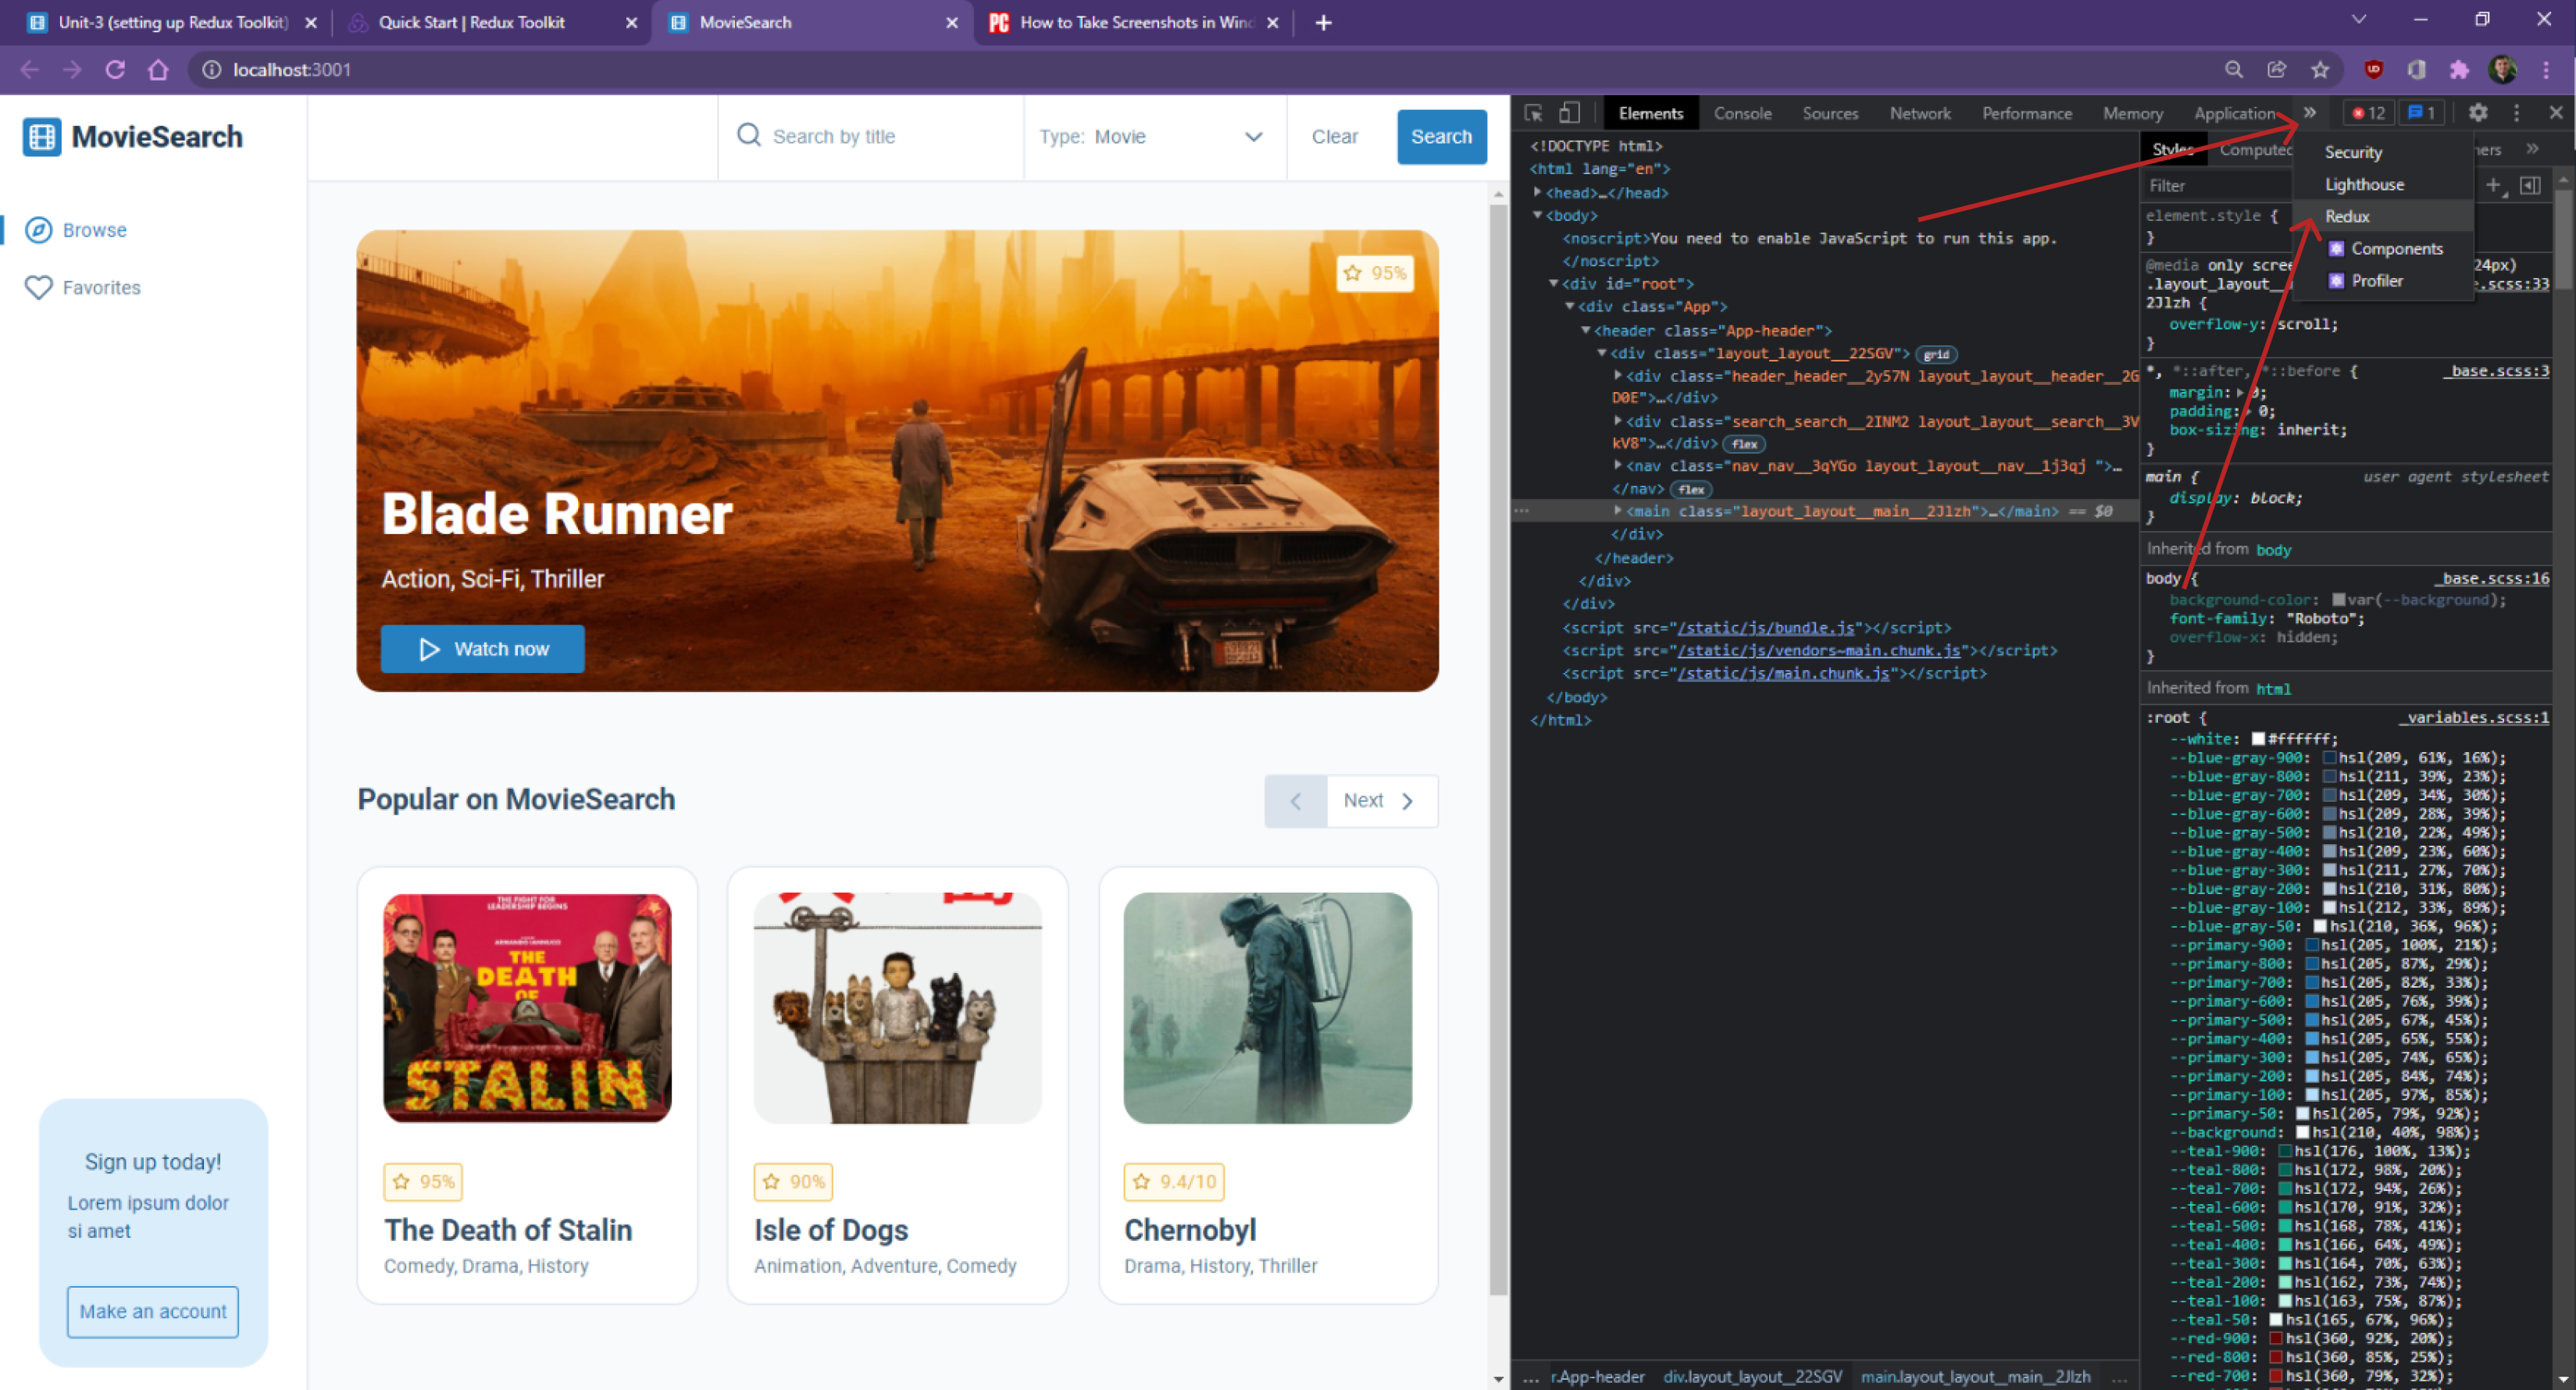
Now we just click on the "State" tab and we should see our favorites state, it should look something like this:
favorites: { value: [] }
Use Redux State and Actions in React Components
caution
In this section we will be adding an onclick to our <Card /> component that adds a movie to the favorites store, however this will only be for testing the useSelector and useDispatch hooks and this will be removed in later units. This is because we are going to use React router to navigate to a new route once the user clicks on the <Card /> component in an upcoming tutorial.
Lets say we want to access or update our favorites store in a component, all we have to do is import the useSelector and useDispatch hooks from 'react-redux' into our component. The useSelectorhook will allow us to read data from the store and the useDispatch hook will allow us to dispatch actions (update our favorites store).
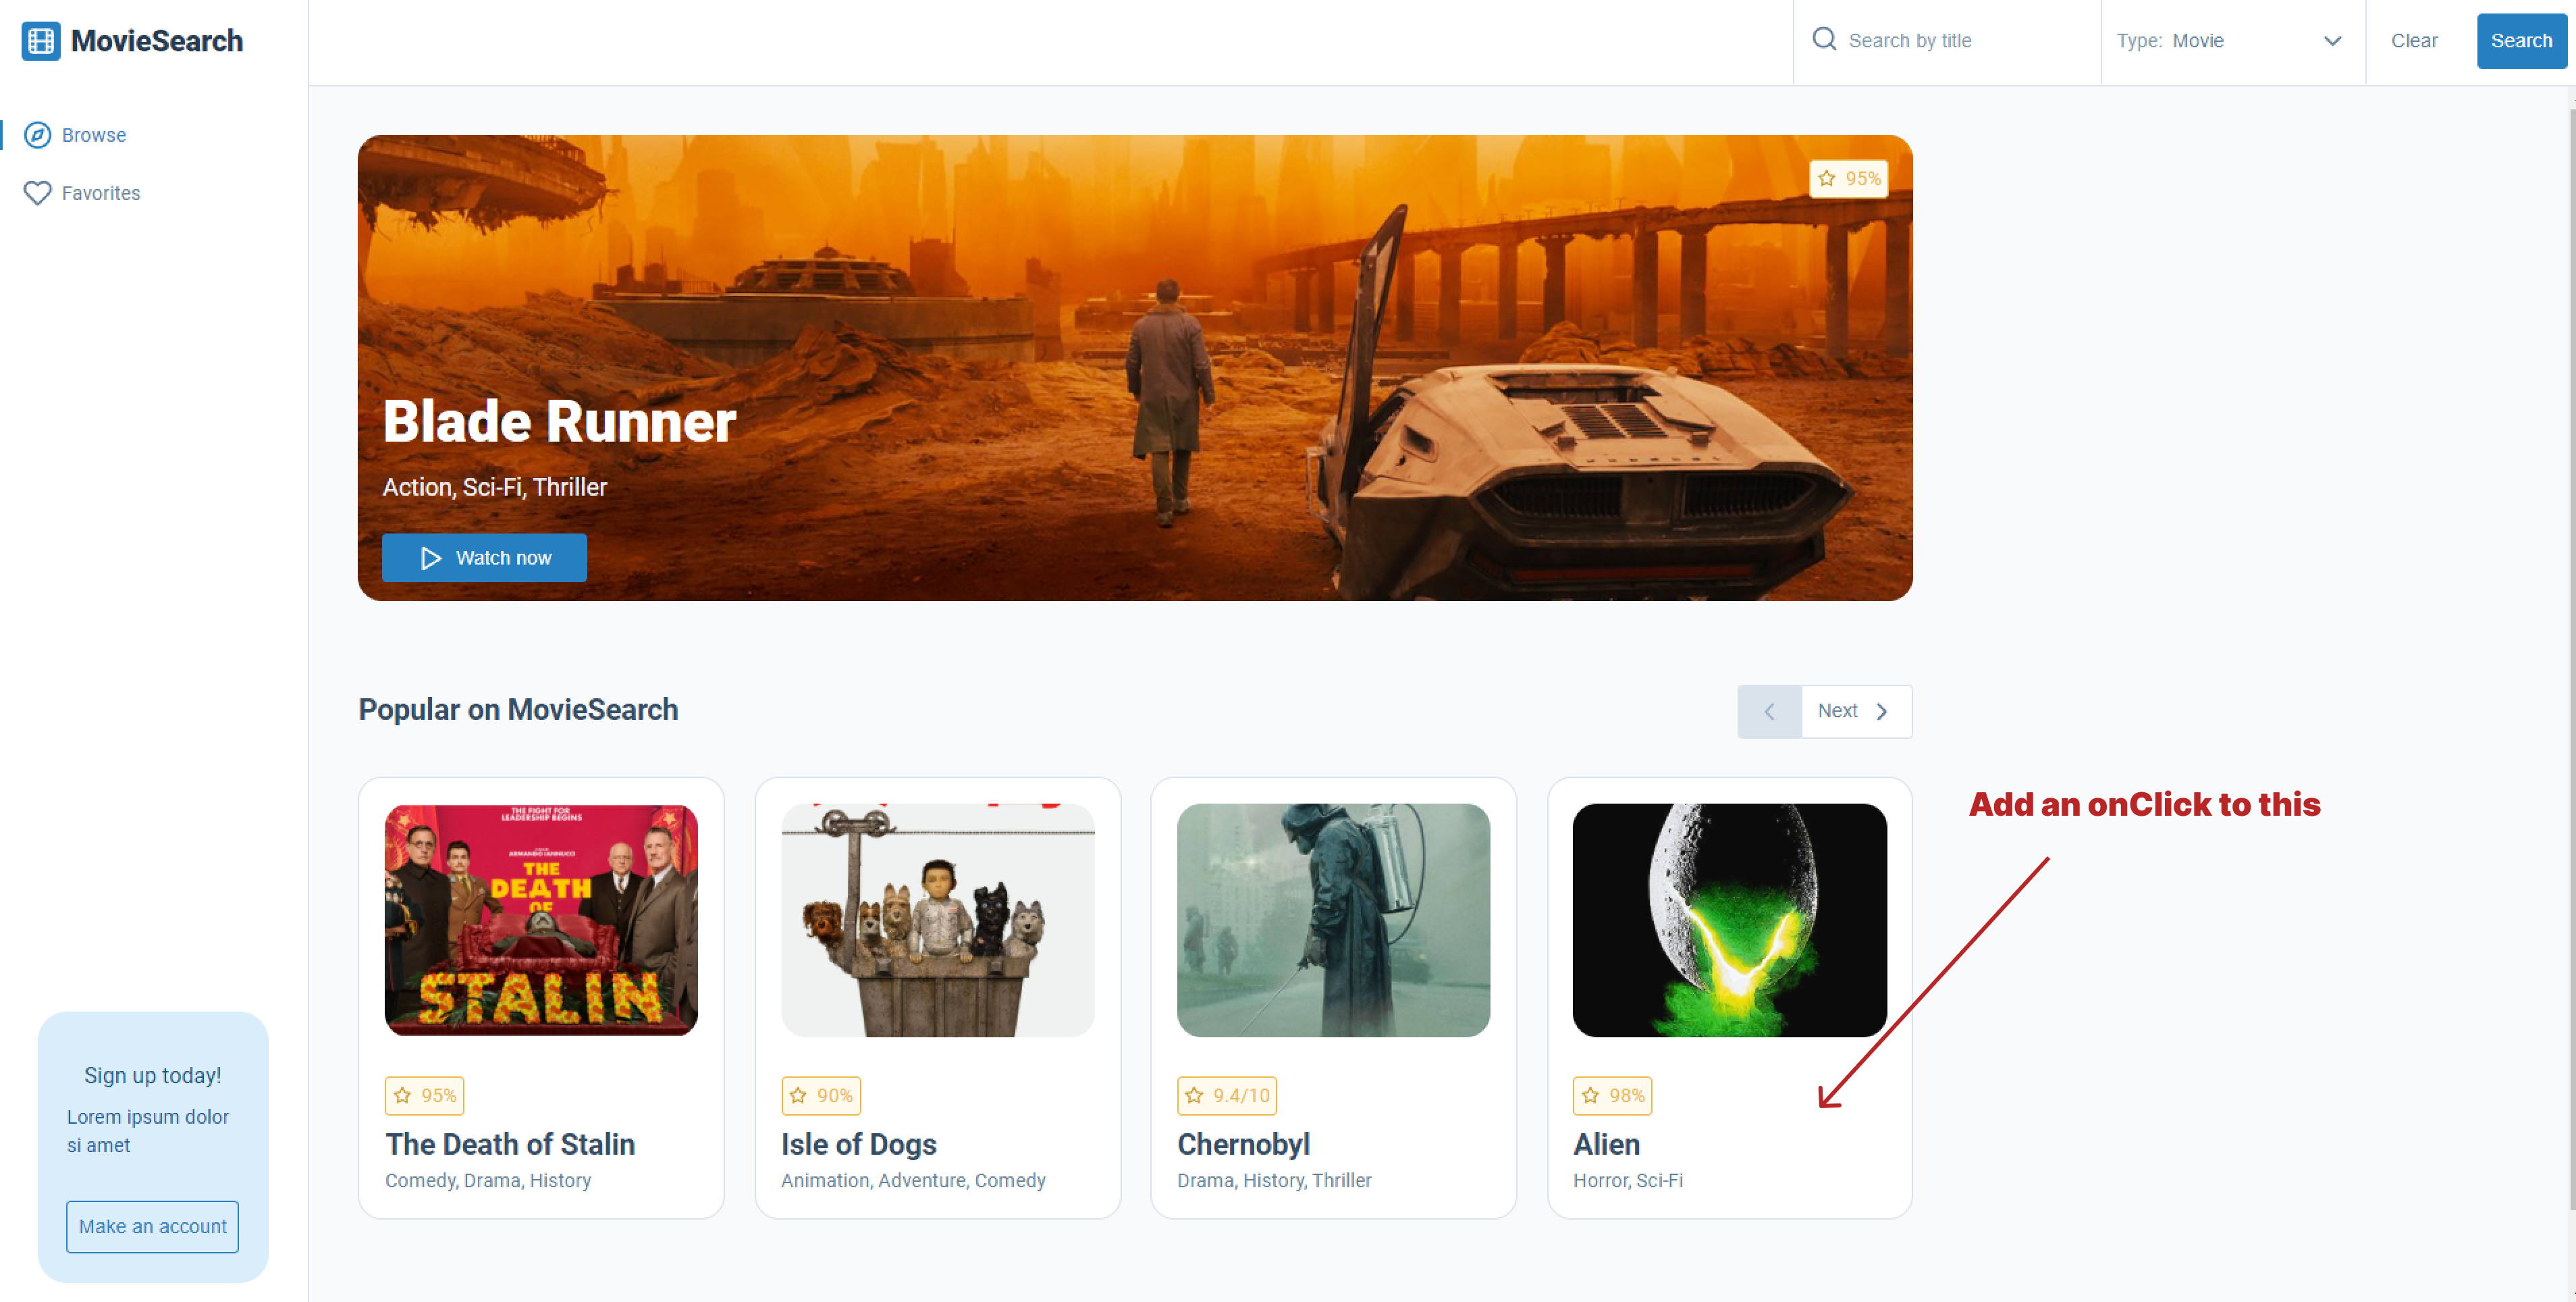
Lets add an onclick to the <Card /> component so when the user clicks on a <Card /> component the cards movie is added to our favorites store.
To do this we will first need to import our useSelector and useDispatch hooks and our addToFavorites reducer into the <Card /> component.
import React from 'react';
import PropTypes from 'prop-types';
import { useSelector, useDispatch } from 'react-redux'; // Add this line
import styles from './card.module.scss';
import StandardImage from '../../atoms/standard-image/standard-image';
import MovieScore from '../../atoms/movie-score/movie-score';
import SecondaryHeading from '../../atoms/typography/secondary-heading/secondary-heading';
import Paragraph from '../../atoms/typography/paragraph/paragraph';
import truncate from '../../../utils/truncate';
Next we can get hold of our favorites store using the useSelector hook.
// Just for testing will be remove in the future (unit-3)
// Get global favorites state
const favorites = useSelector((state) => state.favorites.value);
console.log(favorites);
Now we can declare our dispatch function and add it to a handleClick function. When this handleClick function is fired our addToFavorites action ADD_TO_FAVORITES with the card's movie can be passed into our dispatch. This will update our favorites store to now include our movie.
// This will add the movie to the favorites global state when the card is clicked
const dispatch = useDispatch();
const handleClick = () => {
  dispatch({ type: 'ADD_TO_FAVORITES', payload: movie });
};
We now need to add an onClick to our <Card />, that will fire our handleClick function when the user clicks on the card.
return (
  <div onClick={handleClick} className={`${className} ${styles.card}`}>
    <div className={styles['card__image-container']}>
      <StandardImage src={Poster} alt={Title} />
    </div>
    <MovieScore score={getMovieScore()} />
    <SecondaryHeading>{truncate(Title, 20)}</SecondaryHeading>
    <Paragraph>{Genre}</Paragraph>
  </div>
);
Our <Card /> component with all of the new code should look something like this.
/* eslint-disable jsx-a11y/no-static-element-interactions */
/* eslint-disable jsx-a11y/click-events-have-key-events */
import React from 'react';
import PropTypes from 'prop-types';
import { useSelector, useDispatch } from 'react-redux';
import styles from './card.module.scss';
import getMovieScore from '../../../utils/getMovieScore';
import StandardImage from '../../atoms/standard-image/standard-image';
import MovieScore from '../../atoms/movie-score/movie-score';
import SecondaryHeading from '../../atoms/typography/secondary-heading/secondary-heading';
import Paragraph from '../../atoms/typography/paragraph/paragraph';
import truncate from '../../../utils/truncate';

const Card = ({ className, movie }) => {
  const {
    Title, Poster, Genre, Ratings,
  } = movie;

  // Just for testing will be remove in the future (unit-3)
  // Get global favorites state
  const favorites = useSelector((state) => state.favorites.value);
  console.log(favorites);

  // This will add the movie to the favorites global state when the card is clicked
  const dispatch = useDispatch();
  const handleClick = () => {
    dispatch({ type: 'ADD_TO_FAVORITES', payload: movie });
  };

  return (
    <div onClick={handleClick} className={`${className} ${styles.card}`}>
      <div className={styles['card__image-container']}>
        <StandardImage src={Poster} alt={Title} />
      </div>
      <MovieScore score={getMovieScore(Ratings)} />
      <SecondaryHeading>{truncate(Title, 20)}</SecondaryHeading>
      <Paragraph>{Genre}</Paragraph>
    </div>
  );
};

Card.propTypes = {
  className: PropTypes.string,
  movie: PropTypes.shape.isRequired,
};

Card.defaultProps = {
  className: '',
};

export default Card;
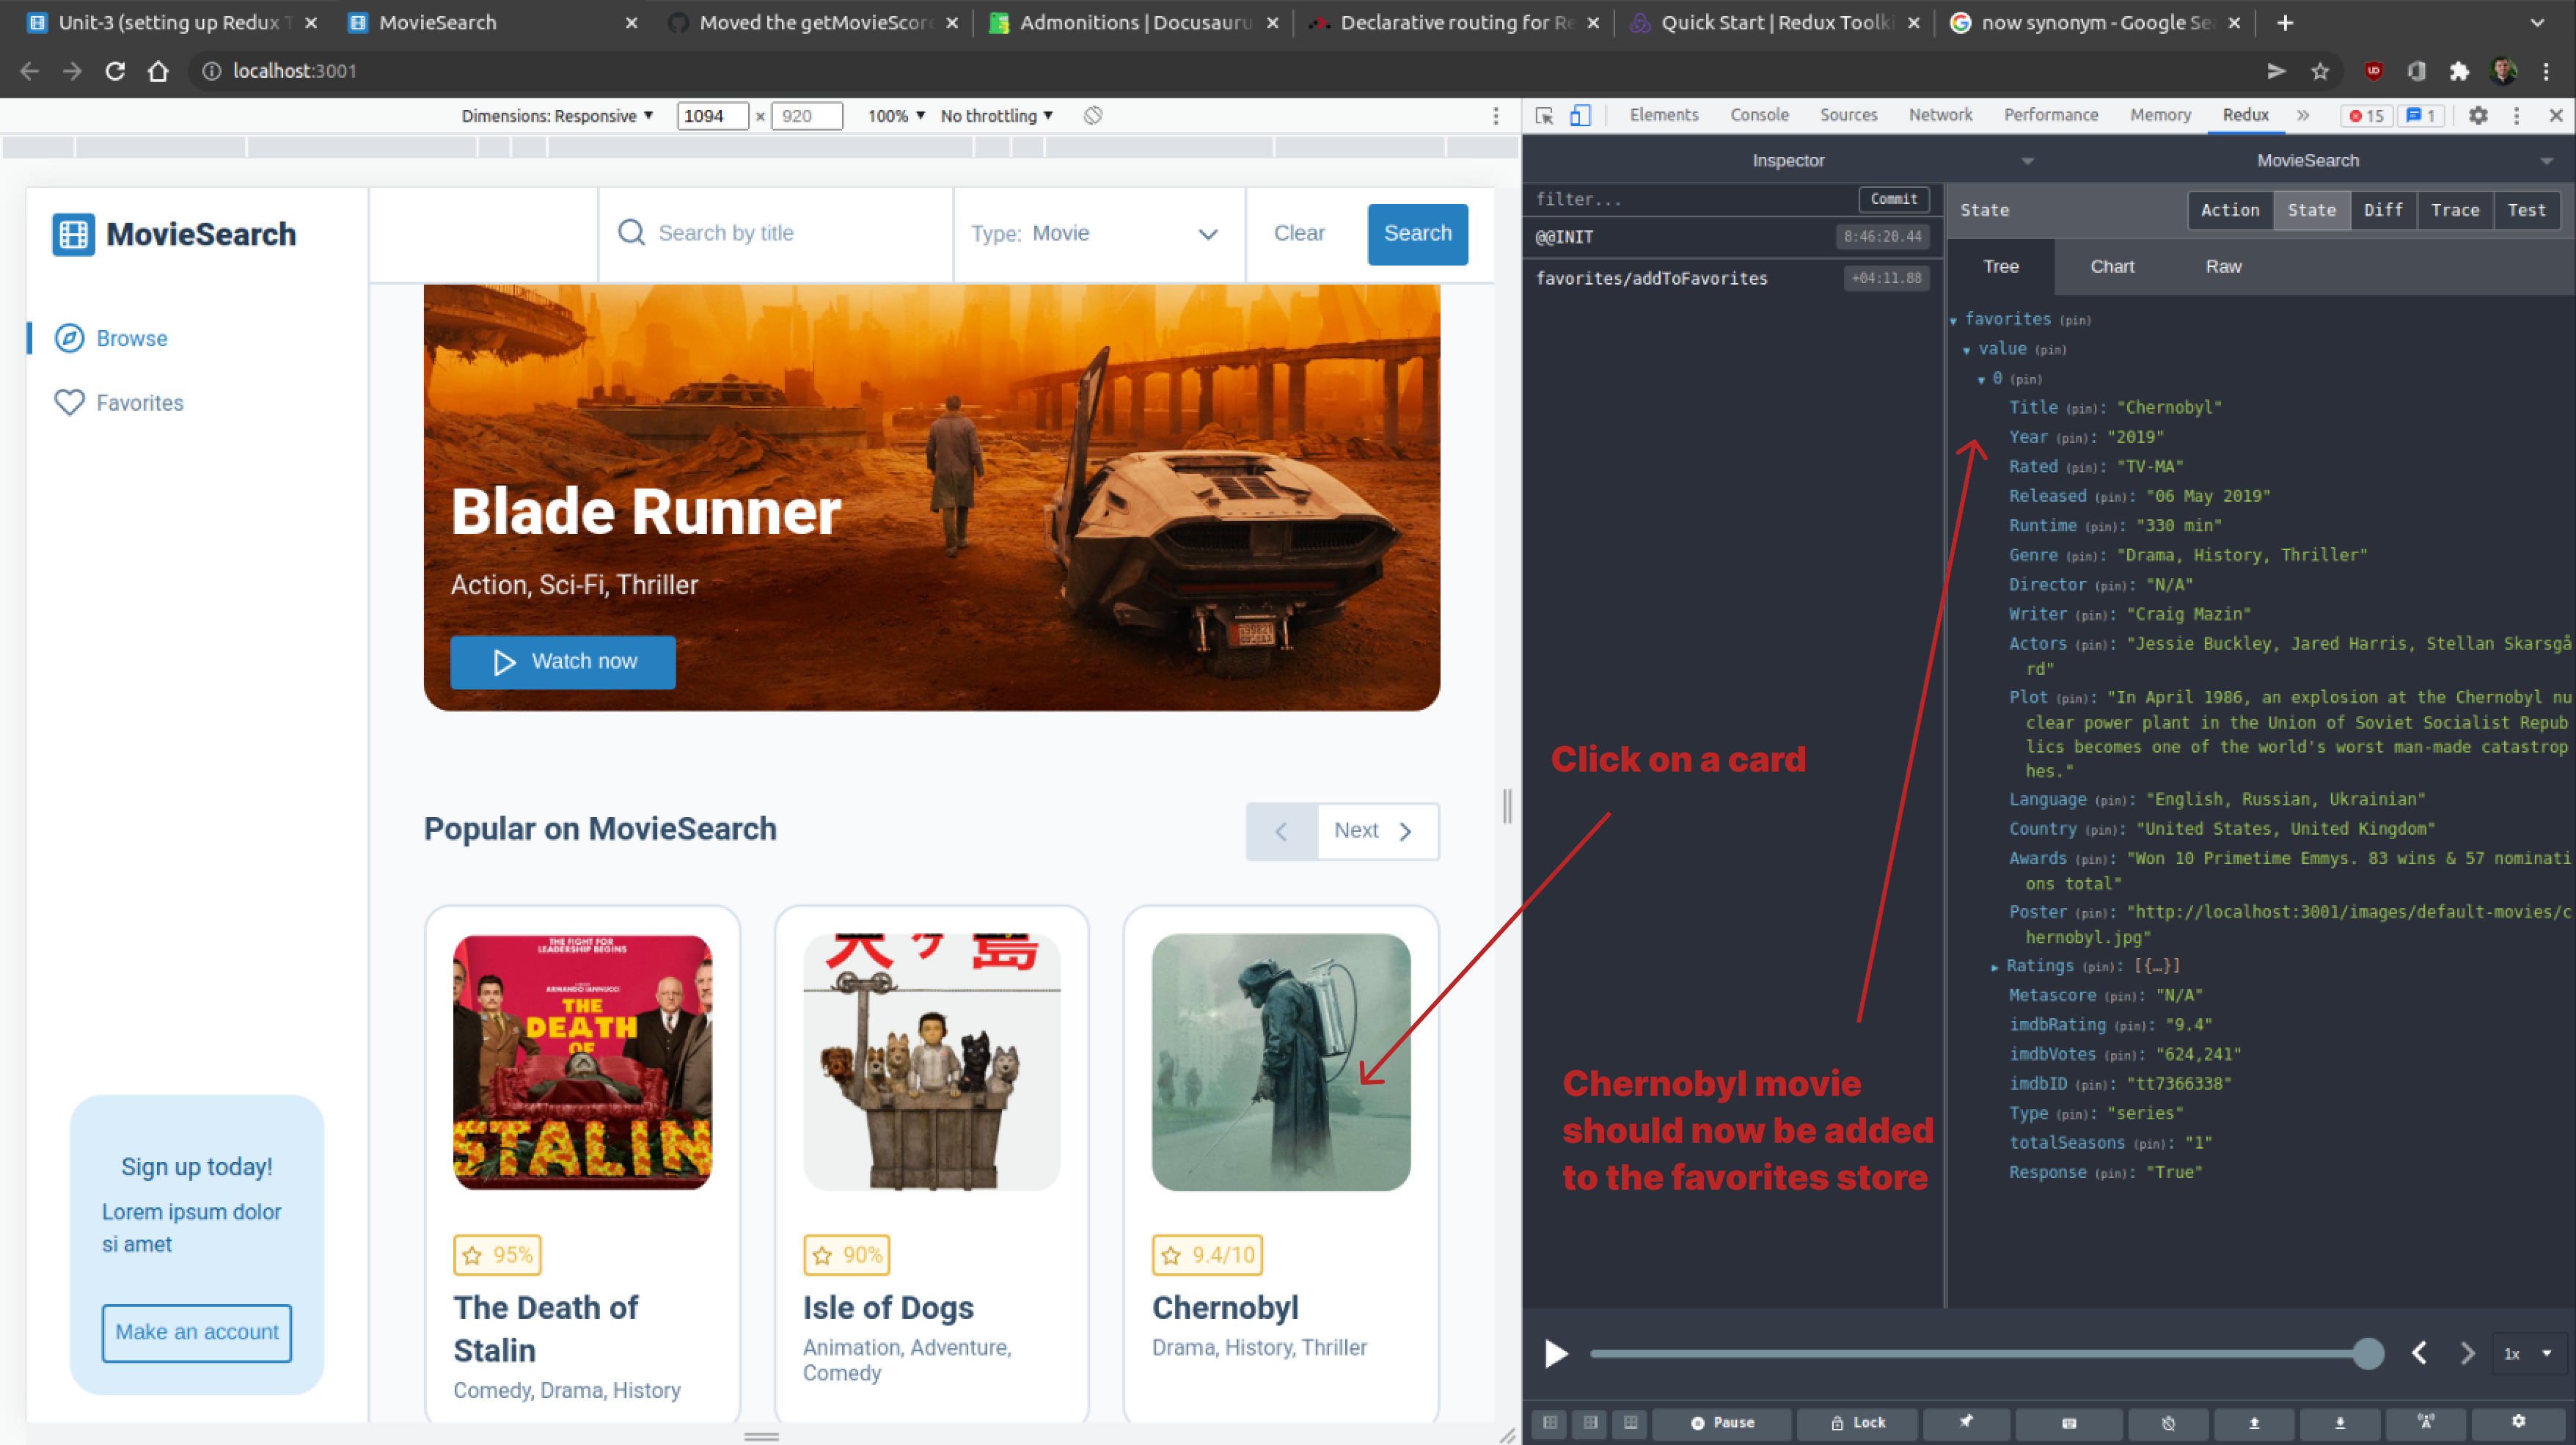
Now lets check that when a user clicks on a Card its added to the favorites store. To do this we will have to open our Redux dev tools again and check our initial state. This should still be favorites: {value: []}.
If we then click on one of our cards the favorites store should be updated to now contain our movie. This should look something like this favorites: {value: [{Tile: "Chernobyl" Year:"2019" ...}]}.
Task
Your task is to add a new reducer called removeFromFavorites, that will be used to remove a movie from the favorites store. You will need to do the following to achieve this:
- Add a new action called "REMOVE_FROM_FAVORITES" to
favoritesActions.js. - Add a new reducer called
removeFromFavoritesthat removes a movie from the favorites store tofavoritesReducer.js - Update the
handleClickin the<Card />component to check the if the movie is in the favorites store, if it is remove the the movie from the store using your newremoveFromFavoritesreducer. But if the movie is not already in the store add the movie to the favorites store using the existingaddToFavoritesreducer.
If you get stuck or get overwhelmed remember you can always get the answer for this task on the unit-3-answers page.